Module 3 | Lesson 4 | Fly-CURE - Alignment
Overview
Teaching: 20 min
Exercises: 360+ minQuestions
How do I find sequence variants between my sample(s) and a reference genome?
Objectives
Understand the steps involved in variant calling.
Describe the types of data formats encountered during variant calling.
Use command line tools to perform variant calling.
NOTE
Expect the alignment to run for 5+ hours. Plan accordingly. One suggestion is to start it in the morning and come back to finish in the afternoon/evening or start at bed-time and finish in the morning.
Recorded Lesson:
Module 3 | Lesson 4 | Fly-CURE - Alignment
Create local directory
We are going to install a tool called GoCommands to facilitate working in a local directory and moving the data to and from the data store.
Since the tool is not yet built into the app, the first step will be to install GoCommands. Video directions in the alignment lesson.
$ cd
$ GOCMD_VER=$(curl -L -s https://raw.githubusercontent.com/cyverse/gocommands/main/VERSION.txt); \
curl -L -s https://github.com/cyverse/gocommands/releases/download/${GOCMD_VER}/gocmd-${GOCMD_VER}-linux-amd64.tar.gz | tar zxvf -
The second step is to connect GoCommands to your account.
$ ./gocmd init (hit enter)
iRODS Host [data.cyverse.org]: (hit enter)
iRODS Port [1247]: (hit enter)
iRODS Zone [iplant]: (hit enter)
iRODS Username: (enter your CyVerse username)
iRODS Password: (enter your CyVerse password and hit enter. *You will not see the text as you are typing.)
The last step is to copy the data you need from the datastore to a local directory. To minimize the data transfer, each lesson will contain the path to grab only the data or directory you need. Although it seems like more work, it will take less time to upload using this method.
$ mkdir -p FlyCURE/results/fastq_trimmed
$ mkdir -p FlyCURE/scripts
$ mkdir -p FlyCURE/ref_genome
$ ./gocmd sync i:/iplant/home/your_username/FlyCURE/results/fastq_trimmed ./FlyCURE/results
All paths in this lesson assume you are working in the local FlyCURE/ directory.
Alignment to a reference genome
We mentioned before that we are working with files from a study of EMS mutated D. melanogaster. Now that we have looked at our data to make sure that it is high quality utilizing FASTQC, and removed low-quality base calls, we can start the variant calling steps to identify unique SNPs for each mutant that may be responsible for the mutant phenotype. We will start by aligning each of our samples to the D. melanogaster BDGP6.46 reference genome (this it the most recent Ensemble release for D. melanogaster), and see what differences exist in our reads versus the reference genome.
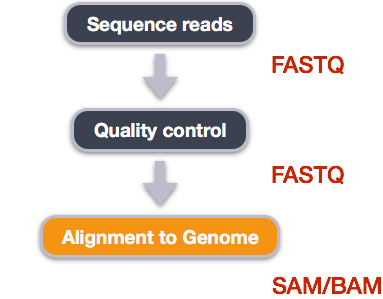
We perform read alignment or mapping to determine where in the genome our reads originated from. There are a number of tools to choose from and, while there is no gold standard, there are some tools that are better suited for particular NGS analyses. We will be using the Burrows Wheeler Aligner (BWA), which is a software package for mapping low-divergent sequences against a large reference genome.
The alignment process consists of two steps:
- Indexing the reference genome
- Aligning the reads to the reference genome
Setting up
First we need to download the reference genome for D. melanogaster BDGP6.46. Although we could copy or move the file with cp or mv, most genomics workflows begin with a download step, so we will practice that here.
We first need to find the link for the genome at Ensemble.org. We are going to use the .fa format which stands for the .fasta sequencing data.Link to most recent Ensemble release for D. melanogaster. We are going to use the toplevel.fa format which stands for the .fasta sequencing data and contains all the chromosomes in D. melanogaster. Link to where the genome data is stored for the BDGP6.46 D. melanogaster genome release Right click the link that says Drosophila_melanogaster.BDGP6.46.dna.toplevel.fa.gz and copy the link address. This address is what we need to use to download the genome into our Jupyter lab app (link provided in the set of commands below).
$ cd FlyCURE
$ curl -L -o ref_genome/bdgp6.46.fa.gz https://ftp.ensembl.org/pub/release-111/fasta/drosophila_melanogaster/dna/Drosophila_melanogaster.BDGP6.46.dna.toplevel.fa.gz
$ gunzip ref_genome/bdgp6.46.fa.gz
Index the reference genome
Our first step is to index the reference genome for use by BWA. Indexing allows the aligner to quickly find potential alignment sites for query sequences in a genome, which saves time during alignment. Indexing the reference only has to be run once. The only reason you would want to create a new index is if you are working with a different reference genome or you are using a different tool for alignment.
$ bwa index ref_genome/bdgp6.46.fa
While the index is created (be patient it will take a few minutes), you will see output that looks something like this:
[bwa_index] Pack FASTA... 1.49 sec
[bwa_index] Construct BWT for the packed sequence...
[BWTIncCreate] textLength=287452004, availableWord=32225820
[BWTIncConstructFromPacked] 10 iterations done. 53158068 characters processed.
[BWTIncConstructFromPacked] 20 iterations done. 98205524 characters processed.
[BWTIncConstructFromPacked] 30 iterations done. 138239796 characters processed.
[BWTIncConstructFromPacked] 40 iterations done. 173818340 characters processed.
[BWTIncConstructFromPacked] 50 iterations done. 205436596 characters processed.
[BWTIncConstructFromPacked] 60 iterations done. 233534948 characters processed.
[BWTIncConstructFromPacked] 70 iterations done. 258504820 characters processed.
[BWTIncConstructFromPacked] 80 iterations done. 280694052 characters processed.
[bwt_gen] Finished constructing BWT in 84 iterations.
[bwa_index] 67.49 seconds elapse.
[bwa_index] Update BWT... 0.57 sec
[bwa_index] Pack forward-only FASTA... 0.46 sec
[bwa_index] Construct SA from BWT and Occ... 36.44 sec
[main] Version: 0.7.17-r1188
[main] CMD: bwa index ref_genome/bdgp6.32.fa
[main] Real time: 106.505 sec; CPU: 105.788 sec
Align reads to reference genome
The alignment process consists of choosing an appropriate reference genome to map our reads against and then deciding on an aligner. We will use the BWA-MEM algorithm, which is the latest and is generally recommended for high-quality queries as it is faster and more accurate.
An example of what a bwa command looks like is below for a single fly stock. This command WILL NOT RUN, as we are using a different reference genome. But what we can use it as a foundation to build our own bwa script.
$ bwa mem ref_genome/Drosophila_melanogaster.BDGP6.22.97.chr.fa \
> fastq_trimmed/A44_R1.trim.fastq.gz \
> fastq_trimmed/A44_R2.trim.fastq.gz > bwa_out/A44.sam &
Have a look at the bwa options page. While we are running bwa with the default parameters here, your use case might require a change of parameters. NOTE: Always read the manual page for any tool before using and make sure the options you use are appropriate for your data.
Since we have used a number of for loops, let’s write a script containing a for loop to run bwa mem starting with the basic formula for running BWA-MEM.
$ bwa mem reference_genome read1.trim.fastq read2.trim.fastq > aligned_PE.sam
If we break this down into parts:
1) We first call the program: bwa mem.
2) We provide the file pathway to the reference genome we have already downloaded and indexed: reference_genome.
3) We provide the to input directories we want aligned to the reference genome: read1.trim.fastq and read2.trim.fastq
4) We want to redirect > the output to a new directory which will create a .sam file
Let’s open nano and start building our bwa.sh script. I’m going to start by writing a number of comments to help me build the script and so I can remember what I did for the future.
$ cd FlyCURE/scripts
$ nano bwa.sh
#!/bin/bash
#the bin/bash line is standard for any script so that we know it is run in bash
# below is our general example
# bwa mem reference_genome read1.trim.fastq read2.trim.fastq > aligned_PE.sam

# below is our example for a single sample by replacing sample names for the general example above. It also includes the directory where the sample is found or put.
# $ bwa mem ref_genome/Drosophila_melanogaster.BDGP6.22.97.chr.fa \
#   fastq_trimmed/A44_R1.trim.fastq.gz \
#   fastq_trimmed/A44_R2.trim.fastq.gz > bwa_out/A44.sam &
This gives us the building blocks or formula to start writing our script. Within the script we are also going to make a new directory where the output will be redirected to.
#!/bin/bash
# This script expects to be run in the fastq_trimmed directory since that is where our input files are located
# It also expects the trimmed reads to have suffixes like shown above
# It also expects the reference genome to be located in the `ref_genome` directory
# The output folder will be `bwa_out`

# The script that will be run is below

mkdir -p ../bwa_out
for read1 in *_R1.trim.fastq.gz; do
  prefix=$(basename ${read1} _R1.trim.fastq.gz)
  bwa mem ../../ref_genome/bdgp6.46.fa \
  ${prefix}_R1.trim.fastq.gz \
  ${prefix}_R2.trim.fastq.gz > ../bwa_out/${prefix}.sam &
done
wait
echo BWA DONE
Let’s breakdown how the for loop was built. We started with making the directory we want our output files to be put. We gave a relative path from where we are calling the script to run from which is FlyCURE/results/fastq_trimmed. Thus you can follow that ../bwa_out is up one directory from fastq_trimmed which would place the bwa_out directory into the FlyCURE/results directory.
We then move into the for loop itself. You should notice we name our variable read1 in the first part of the loop which becomes *_R1.trim.fastq.gz and then proceed to the do. What we want the loop to do is define our prefix by using basename, as we have done previously, to remove the suffix _R1.trim.fastq.gz but keep the prefix, which in this case is our sample name. The next part of the loop is replacing the sample names with the variable ${prefix} for our 2 input files. There are two input files because we have data obtained from a Paired End sequencing methodology.
Lastly, the loop says to redirect the output > to our new directory and name the outputs by sample name, defined by the ${prefix} and give it a .sam suffix.
The last step is to save the script, make it executable, and run the script.
$ chmod +x bwa.sh
You should see the color change once it is executable. Move into your fastq_trimmed/ and run the script.
$ cd FlyCURE/results/fastq_trimmed
$ ../../scripts/bwa.sh &
You will see output that starts like this and this will take a few hours (plan for 5+ hours). If you want to monitor the progress of any of your scripts, open a second terminal using the + at the top left of JupyterLab. Open the terminal and type top. This will load all the processes you are running so you can watch them. You can do this for any of the upcoming scripts. I’ve also added wait and echo DONE to the scripts so that you will have a visual in your terminal when all the files are done. You seeing this DONE should correspond with when you see your processes stop in top.
[M::bwa_idx_load_from_disk] read 0 ALT contigs
[M::bwa_idx_load_from_disk] read 0 ALT contigs
...
[M::process] read 132388 sequences (10000047 bp)...
[M::process] read 132380 sequences (10000107 bp)...
...
[M::mem_pestat] # candidate unique pairs for (FF, FR, RF, RR): (1, 51443, 9, 1)
[M::mem_pestat] skip orientation FF as there are not enough pairs
[M::mem_pestat] analyzing insert size distribution for orientation FR...
[M::mem_pestat] (25, 50, 75) percentile: (311, 358, 411)
[M::mem_pestat] low and high boundaries for computing mean and std.dev: (111, 611)
[M::mem_pestat] mean and std.dev: (361.89, 76.20)
-rw-r--r-- 1 gea_user gea_user 9.8G Feb 21 10:43 A44.sam
-rw-r--r-- 1 gea_user gea_user  17G Feb 21 10:53 B-1-3.sam
-rw-r--r-- 1 gea_user gea_user  16G Feb 21 10:49 B-2-13.sam
-rw-r--r-- 1 gea_user gea_user  16G Feb 21 11:19 B-2-16.sam
-rw-r--r-- 1 gea_user gea_user  14G Feb 21 11:32 Control.sam
-rw-r--r-- 1 gea_user gea_user  18G Feb 21 12:42 F-1-4.sam
-rw-r--r-- 1 gea_user gea_user  15G Feb 21 09:40 E-2-2.sam
-rw-r--r-- 1 gea_user gea_user  16G Feb 21 10:50 G-3-4.sam
-rw-r--r-- 1 gea_user gea_user  19G Feb 21 12:46 H22.sam
-rw-r--r-- 1 gea_user gea_user  16G Feb 21 10:18 H-3-2.sam
-rw-r--r-- 1 gea_user gea_user  19G Feb 21 12:42 L31.sam
-rw-r--r-- 1 gea_user gea_user  17G Feb 21 11:22 L-3-2.sam
-rw-r--r-- 1 gea_user gea_user  17G Feb 21 11:06 N-1-1.sam
-rw-r--r-- 1 gea_user gea_user  17G Feb 21 11:00 N-1-4.sam
-rw-r--r-- 1 gea_user gea_user  16G Feb 21 10:16 O-2-2.sam
Let’s compress the files to make them take up less space and our conversions go a little faster by zipping the .sam files. Again, this step is likely to take a few hours. The v flag will tell it to be verbose while it’s running the program. .
You may have to install pigz again to use it. You can try without installing and if it doesn’t work, just re-install it again.
$ cd ~/home
$ sudo apt-get install pigz
Next navigate to bwa_out and zip the files.
$ cd FlyCURE/results/bwa_out
$ pigz -v *.sam
The final output should look like this. Always pay attention to the file sizes. If you are seeing something different, the process may not be complete or there was likely an error at an earlier step.
total 57G
-rw-r--r-- 1 gea_user gea_user 2.6G Feb 21 10:43 A44.sam.gz
-rw-r--r-- 1 gea_user gea_user 3.8G Feb 21 10:53 B-1-3.sam.gz
-rw-r--r-- 1 gea_user gea_user 3.8G Feb 21 10:49 B-2-13.sam.gz
-rw-r--r-- 1 gea_user gea_user 3.7G Feb 21 11:19 B-2-16.sam.gz
-rw-r--r-- 1 gea_user gea_user 3.4G Feb 21 11:32 Control.sam.gz
-rw-r--r-- 1 gea_user gea_user 4.6G Feb 21 12:42 F-1-4.sam.gz
-rw-r--r-- 1 gea_user gea_user 3.3G Feb 21 09:40 E-2-2.sam.gz
-rw-r--r-- 1 gea_user gea_user 3.7G Feb 21 10:50 G-3-4.sam.gz
-rw-r--r-- 1 gea_user gea_user 4.9G Feb 21 12:46 H22.sam.gz
-rw-r--r-- 1 gea_user gea_user 3.6G Feb 21 10:18 H-3-2.sam.gz
-rw-r--r-- 1 gea_user gea_user 4.8G Feb 21 12:42 L31.sam.gz
-rw-r--r-- 1 gea_user gea_user 4.0G Feb 21 11:22 L-3-2.sam.gz
-rw-r--r-- 1 gea_user gea_user 3.9G Feb 21 11:06 N-1-1.sam.gz
-rw-r--r-- 1 gea_user gea_user 4.1G Feb 21 11:00 N-1-4.sam.gz
-rw-r--r-- 1 gea_user gea_user 3.5G Feb 21 10:16 O-2-2.sam.gz
Save analysis back to the data datastore
Since we were working locally, you will want to save your work to the datastore for future access. DO NOT FORGET THIS STEP.
$ cd
$ ./gocmd sync --single_threaded FlyCURE/results/bwa_out i:/iplant/home/your_username/FlyCURE/results
$ ./gocmd sync --single_threaded FlyCURE/ref_genome i:/iplant/home/your_username/FlyCURE/
Note: The --single_threaded flag reduces the number of TCP connections (aka communication between devices over a network) to 1 thread which will create 4 TCP connections. The assumption is the amount of TCP connections we are creating is overwhelming our environment. By reducing the number of threads and TCP connections this “should” prevent the syncs from failing. This is also dependent upon how many people are trying to do this at the same time. Fewer threads means the sync will be slower. If you want, you can also use the flag --thread_num 0 and replace the number with 1 or 2 or 3 or 4 to increase the number of threads and therefore the processing speed, but you increase failure by increasing threads. Each thread creates 4 TCP connections.
Key Points
Bioinformatic command line tools are collections of commands that can be used to carry out bioinformatic analyses.
To use most powerful bioinformatic tools, you’ll need to use the command line.
There are many different file formats for storing genomics data. It’s important to understand what type of information is contained in each file, and how it was derived.